更新日:、 作成日:
Windows 10 IME を Google 日本語入力に切り替える
はじめに
Windows10 で IME を Google 日本語入力に切り替える方法を紹介します。
Google 日本語入力をインストールしたら、タスクバーの IME をクリックして切り替えられます。
Win ![]() キーを押しながら Space キーを入力しても切り替えられます。
キーを押しながら Space キーを入力しても切り替えられます。
設定の言語から既定の IME やログイン時の IME に設定できます。
Google 日本語入力に切り替える
「Google 日本語入力」や「ATOK」などの IME をダウンロードしてインストールします。インストール方法は省略します。
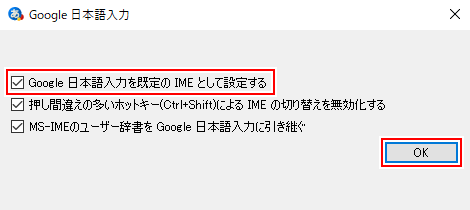
インストール時に必ず [既定の IME として設定する] をチェックします。チェックしないと、既定にできなくなることがあります。
インストールするとタスクバーに IME が表示されます。それをクリックして切り替えたい [IME] を選択します。
Win ![]() キーを押しながら Space キーを入力しても切り替えられます。
キーを押しながら Space キーを入力しても切り替えられます。

IME が切り替わります。
Google 日本語入力を既定の IME に設定する
Windows にログインしたときの既定の IME を設定できます。
[スタートボタン] をクリックして [設定] をクリックします。
[時刻と言語] をクリックします。
[言語] をクリックします。
[キーボード] をクリックします。
既定の入力方式の上書きから既定にしたい [IME] を選択します。
インストールするときに [既定の IME に設定する] をチェックしないと表示されないことがあります。
ログインしたときの IME の初期状態が変更されます。
アプリ ウィンドウ毎に異なる入力方式を設定する
入力方式の切り替えから [アプリ ウィンドウごとに異なる入力方式を設定する] をチェックすると、アプリ毎に IME の種類 (Google 日本語入力、Microsoft IME) を覚えられます。
チェックを外すと、切り替えた IME がすべてのアプリで切り替わります。
スポンサーリンク
ログイン画面に設定する
既定の IME を設定してもログイン時のパスワードを入力するときは Microsoft IME が既定になっています。これを変更する方法を紹介します。
先に、ログイン画面に設定したい IME を上記の「既定の IME を設定する」方法で既定にしておきます。
タスクバーの [IME] をクリックして [言語設定] をクリックします。
[管理用の言語の設定] をクリックします。
[設定のコピー] をクリックします。
[ようこそ画面とシステムアカウント] をチェックして [OK] をクリックします。
これでログイン画面のパスワードを入力するときの IME が変更されます。