更新日:、 作成日:
Windows 10 ユーザー アカウントの画像を変更する
はじめに
Windows10 でユーザー アカウントの画像を変更する方法を紹介します。
設定 > アカウント からアカウントの画像を変更できます。これはログイン画面のアイコンにも使用されます。
Microsoft アカウントの画像を Web サイトから変更したときは Windows に反映されません。
画像を元に戻す方法も紹介します。
ユーザー アカウントの画像を変更する
サンプル画像などは用意されていないため、インターネットなどから画像を探すか、カメラで撮影する必要があります。
[スタートボタン] をクリックして [設定] をクリックします。
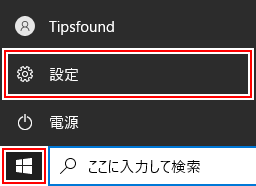
[アカウント] をクリックします。
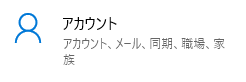
[ユーザーの情報] をクリックします。

「自分の画像を作成」の [参照] をクリックします。
用意しておいた [画像ファイル] を選択すると、それがアカウントの画像になります。
Microsoft アカウント
上記の方法で Microsoft アカウントの画像を変更すると「ユーザー情報」の画像も変更されます。ただし、「ユーザー情報」のページから画像を変更したり削除しても、Windows には反映されません。
画像を元に戻す
元の画像に戻す操作はありません。必ずなにか画像を選択する必要があります。そこで元の画像と同じファイルを選択して元に戻します。
エクスプローラーを表示し、アドレスバーに次の [パス] を入力して Enter キーを入力します。
この場所に元と同じ画像があるので、それをアカウントの画像として設定します。
もし画像が存在しなかったら、次の [画像] を右クリックして [名前を付けて画像を保存] から保存できます。
スポンサーリンク
アプリにアカウントの画像を使わせない
[スタートボタン] をクリックして [設定] をクリックします。
[プライバシー] をクリックします。
[アカウント情報] をクリックします。
「このデバイスのアカウント情報へのアクセスを許可する」 の [変更] をクリックします。
クリックして [オフ] の状態にします。
これでアプリにアカウントの情報を渡さなくなります。
スポンサーリンク