更新日:、 作成日:
ワード 表を削除する
はじめに
ワードの表を削除する方法を紹介します。
表の他に行や列、セルも削除できます。
セルの挿入方法も紹介します。
表を削除する
削除する [表] をクリックします。

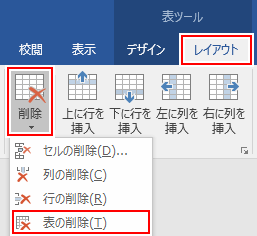
表ツールの [レイアウト] タブをクリックし、行と列グループにある [削除] から [表の削除] をクリックします。
または [セル] を右クリックして [削除] からも同じことができます。

表が削除されます。
スポンサーリンク
行を削除する
削除する行の [セル] をクリックまたは範囲選択します。
表ツールの [レイアウト] タブをクリックし、行と列グループにある [削除] から [行の削除] をクリックします。
選択した行が削除されます。
[行] を範囲選択して Delete キーを入力しても削除できます。表の外側にある改行記号の部分まで範囲選択する必要があります。
列を削除する
削除する列の [セル] をクリックまたは範囲選択します。
表ツールの [レイアウト] タブをクリックし、行と列グループにある [削除] から [列の削除] をクリックします。
選択した列が削除されます。
[列] を範囲選択して Ctrl + X キーを入力しても削除できます。
セルを削除する
削除する [セル] をクリックします。
表ツールの [レイアウト] タブをクリックし、行と列グループにある [削除] から [セルの削除] をクリックします。
削除後の動作を選択して [OK] をクリックします。ここでは「セルを削除後、左に詰める」をチェックします。
セルが削除されて、左に詰められます。
挿入する
詰められたセルを右クリックし、「挿入」をクリックして「セルの挿入」をクリックします。
挿入後の [動作] を選択して「OK」をクリックします。ここでは [セルを挿入後、右に伸ばす] をチェックします。
詰められた表が元通りになります。
罫線を削除する
罫線を削除すると表や行や列やセルを削除できます。
表ツールの [レイアウト] タブをクリックし、罫線の作成グループにある [罫線を削除] をクリックします。
削除したい [罫線] をマウスでドラッグします。
その罫線が削除されます。
別の場所をクリックするか、もう一度 [罫線を削除] をクリックして罫線を削除する状態を解除できます。
スポンサーリンク