更新日:、 作成日:
ワード 原稿用紙のように入力する
はじめに
ワードを原稿用紙のように入力する方法を紹介します。
制限なしに入力できます。マス目の表示や好きな文字数や行数にできます。
行末の句読点を 1 マスに収められます。
原稿用紙のように入力するとは
「原稿用紙に設定する」の方法を使用すると、書式やヘッダーなど多くの機能が制限されます。
このページで紹介している方法を使用すると、制限をなくして原稿用紙設定と同じように表示できます。
原稿用紙のように設定する
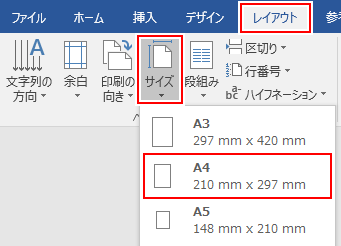
[レイアウト] タブをクリックし、ページ設定グループにある [サイズ] から [A4] をクリックします。
[文字列の方向] をクリックして [横書き] または [縦書き] をクリックします。

- 横書きの時は [印刷の向き] をクリックして [縦] をクリックします。
- 縦書きの時は [印刷の向き] をクリックして [横] をクリックします。
[余白] をクリックして [ユーザー設定の余白] をクリックします。
余白の上下に [25.4 mm] を入力し、左右に [30 mm] を入力して [OK] をクリックします。
ページ設定グループにある [右下矢印] をクリックします。
[文字数と行数] タブをクリックし、[原稿用紙の設定にする] をチェックして [文字数] と [行数] に [20] を入力して [OK] をクリックします。
これで原稿用紙のように入力できます。
スポンサーリンク
原稿用紙のマス目を表示する
次の [画像] を右クリックしてダウンロードします。
[デザイン] タブをクリックし、ページの背景グループにある [ページの色] から [塗りつぶし効果] をクリックします。
[図] タブをクリックし、[図の選択] からダウンロードした [画像] を選択して [OK] をクリックします。
原稿用紙のマス目が表示されます。
マス目を印刷する
背景の画像はそのままでは印刷されません。印刷するには [ファイル] をクリックして [オプション] をクリックします。
[表示] をクリックし、印刷オプションにある [背景の色とイメージを印刷する] をチェックして [OK] をクリックします。
マス目が印刷されるようになります。
行末の句読点を 1 マスに収める
行末の [文字] と [句読点] を範囲選択します。
[ホーム] タブをクリックして、フォントグループにある [右下矢印] をクリックします。
[詳細設定] タブをクリックし、[[ページ設定]で指定した 1 行の文字数を使用する] のチェックを外して [OK] をクリックします。
句読点が一つのマスに収まります。
スポンサーリンク